



 Get A Quote
  (224)366-0290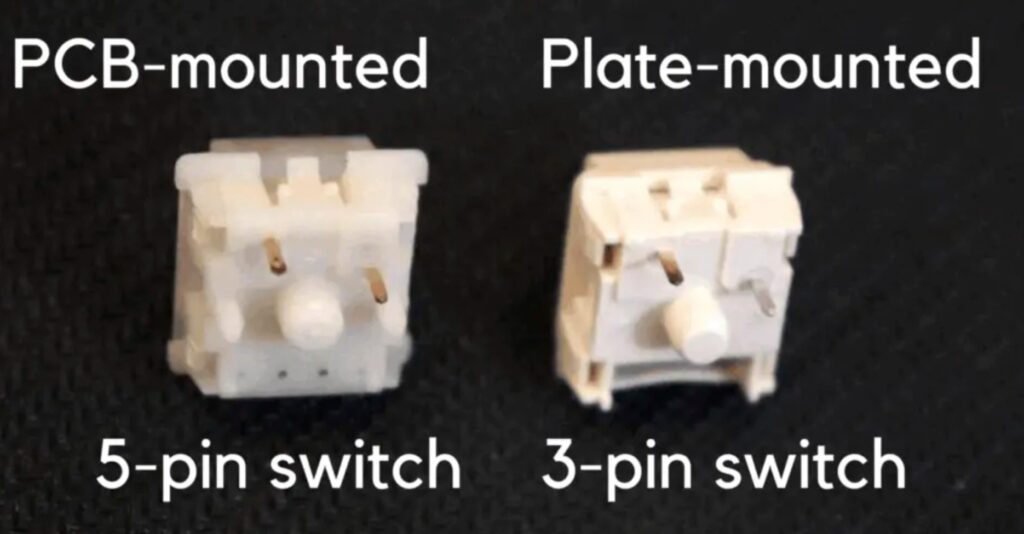
When building or upgrading a mechanical keyboard, one of the important decisions is choosing the right switch mounting style. Two common options are 3-pin and 5-pin switches, which are designed to work with different PCB and mounting configurations.
Although the difference may appear small, the number of pins affects how securely a switch sits on the PCB and whether it requires additional support from a mounting plate. Understanding these differences can help you select the right components for a custom mechanical keyboard and avoid compatibility issues.
What Is the Difference Between 3-Pin and 5-Pin Switches?
The primary difference between 3-pin and 5-pin switches is the number of legs on the bottom of the switch.
A 3-pin switch has two metal pins that provide the electrical connection and one plastic center post for alignment. A 5-pin switch includes the same three components plus two additional plastic stabilizing legs.
These extra legs do not carry an electrical signal. Instead, they provide additional support and help keep the switch firmly positioned on the PCB.
| Feature | 3-Pin Switch | 5-Pin Switch |
|
Metal electrical pins |
2 |
2 |
| Center alignment post |
1 |
1 |
| Additional stabilizing legs |
0 |
2 |
| Total pins |
3 |
5 |
| PCB support |
Moderate |
Higher |
| Plate compatibility |
Generally suitable |
Suitable for compatible PCBs |
The important point is that 3-pin and 5-pin switches do not differ electrically simply because of their pin count. The additional two pins on a 5-pin switch are primarily intended to improve mechanical stability.
Understanding 5-Pin PCB-Mounted Switches
A 5-pin switch is commonly associated with PCB mounting because it has additional plastic legs that fit into corresponding holes in a compatible PCB.
The switch typically consists of:
- Two metal pins for electrical connection
- One central plastic alignment post
- Two additional plastic stabilizing legs
When installed directly onto a compatible PCB, these extra legs help prevent the switch from moving or rocking from side to side. This can provide a more secure foundation for the key switch.
PCB-mounted designs can also be useful when a keyboard is designed without a separate mounting plate. However, the overall rigidity of the keyboard depends on factors such as PCB thickness, case construction, mounting method, and assembly quality.
What Are 3-Pin Plate-Mounted Switches?
A 3-pin switch has two metal electrical pins and one central plastic alignment post. Unlike a 5-pin switch, it does not have the two additional plastic legs.
This does not mean that the switch is inherently inferior. In a plate-mounted keyboard, the mounting plate provides much of the mechanical support that the additional legs would otherwise provide.
The switch is positioned through the plate, while the electrical pins connect to the PCB. Once installed correctly, the plate helps keep the switch aligned and reduces unwanted movement during typing.
This makes 3-pin switches a practical option for keyboards that use a compatible mounting plate.
Plate Mounting vs. PCB Mounting
The mounting method affects the overall feel and stability of a mechanical keyboard.
Plate Mounting
With plate mounting, the switches are inserted into a metal or other rigid mounting plate positioned above the PCB. The switches are then connected to the PCB, typically through soldering or a compatible hot-swap socket.
The plate provides structural support and helps reduce movement when keys are pressed. This can be particularly useful for larger keyboards where additional rigidity is desirable.
A plate-mounted keyboard can also provide a more solid and consistent typing experience. However, depending on the construction, removing or replacing switches may require more work, especially when the switches are soldered directly to the PCB.
PCB Mounting
With PCB mounting, the switch is supported directly by the circuit board rather than relying primarily on a separate plate.
A 5-pin switch is well suited to this configuration because its additional plastic legs provide extra stability. PCB-mounted designs can offer a simpler construction and may reduce the number of components required.
However, without a mounting plate, the overall keyboard structure can feel more flexible. The final result depends on the PCB design, case, mounting system, and materials used.
3-Pin vs. 5-Pin Switches: Which Is Better?
There is no universal winner between 3-pin and 5-pin switches. The better choice depends on the PCB and keyboard design.
Choose 5-pin switches when:
- Your PCB supports five-pin switches.
- You want additional switch stability.
- You are building a PCB-mounted keyboard.
- You prefer a secure and firm switch installation.
Choose 3-pin switches when:
- Your keyboard uses a mounting plate.
- Your PCB is designed specifically for 3-pin switches.
- You want a straightforward option for a plate-mounted build.
- You already have compatible 3-pin switches available.
Compatibility should always be checked before purchasing switches. The PCB’s layout and socket configuration are more important than simply choosing a switch based on its pin count.
Can a 3-Pin Switch Work on a 5-Pin PCB?
In many cases, yes.
A PCB designed to accommodate 5-pin switches generally has the additional holes required for the two stabilizing legs. A 3-pin switch can usually be installed because it does not need those additional holes.
The switch may still function normally because the two missing plastic legs are not electrical connections. However, the switch may have slightly less mechanical support than a 5-pin switch.
This is one reason 3-pin switches can be useful for custom keyboard builds where the PCB, plate, and case are selected separately.
Can a 5-Pin Switch Be Used on a 3-Pin PCB?
This depends on the PCB design.
If the PCB does not have openings for the two additional stabilizing legs, a standard 5-pin switch may not sit correctly. In such cases, some builders modify the switch by carefully removing the two extra plastic legs.
The modification does not affect the electrical connection because those two legs are not responsible for transmitting the keyboard signal. However, care is required to avoid damaging the two metal electrical pins or the central alignment post.
If you are modifying switches, use an appropriate small cutting tool and work carefully to avoid damaging the switch housing.
3-Pin vs. 5-Pin Switches and Hot-Swap Keyboards
Hot-swap keyboards allow switches to be installed and removed without soldering each switch directly to the PCB. However, it is important to understand that the hot-swap feature comes from the socket mounted on the PCB, not from the switch itself.
A hot-swap PCB can be designed to accommodate particular switch configurations. Many boards support both 3-pin and 5-pin switches, but compatibility should always be confirmed before installation.
When selecting switches for a hot-swap keyboard, check:
- The PCB’s switch compatibility.
- The number and position of mounting holes.
- Whether a mounting plate is included.
- The type of hot-swap sockets used.
- The physical dimensions of the switch.
This simple check can prevent installation problems and unnecessary modifications.
Does the Number of Pins Affect Typing Feel?
The pin count itself does not determine the switch’s electrical performance or its basic switch characteristics.
Typing feel is influenced by several factors, including:
- Switch design
- Spring weight
- Linear, tactile, or clicky mechanism
- Keycap material
- Mounting style
- Plate material
- PCB construction
- Keyboard case
- Overall mounting system
However, the additional stabilizing legs on a 5-pin switch can help reduce unwanted movement. This may make the switch feel more secure, particularly in a PCB-mounted build.
For this reason, some users prefer 5-pin switches when building a custom keyboard, while others prefer 3-pin switches when working with a plate-mounted design.
How to Convert a 5-Pin Switch Into a 3-Pin Switch
If you have 5-pin switches but your PCB only accepts 3-pin switches, the two additional plastic legs can generally be removed.
The process is straightforward:
- Turn the switch over and identify the two small plastic legs.
- Use a small flush cutter, nail clipper, or suitable precision cutting tool.
- Carefully remove only the two plastic stabilizing legs.
- Leave the two metal electrical pins and central plastic post intact.
- Check the bottom of the switch for any remaining plastic pieces.
- Test the modified switch before installing it throughout the keyboard.
The two plastic legs are not required for the electrical operation of the switch. Nevertheless, modification should be performed carefully because accidentally damaging the metal pins can prevent the switch from functioning properly.
How to Choose the Right Switch for Your Keyboard
Before buying switches, start with the PCB rather than the switch itself. Confirm whether the board supports 3-pin switches, 5-pin switches, or both.
If your keyboard has a mounting plate and supports 3-pin switches, a 3-pin option can work perfectly well. If your PCB supports 5-pin switches and you want additional mechanical stability, 5-pin switches can be a convenient choice.
For custom keyboard projects, it is also useful to consider the complete assembly rather than looking at the switch in isolation. The PCB, mounting plate, case, hot-swap sockets, keycaps, and switches all contribute to the final result.
Reliable PCB assembly and accurate component placement are equally important when developing electronic products that incorporate custom PCB designs. Professional assembly processes can help ensure components are placed, soldered, inspected, and tested according to the required specifications.
Conclusion
The difference between 3-pin and 5-pin mechanical keyboard switches is mainly mechanical rather than electrical. Three-pin switches have two metal pins and one central alignment post, while five-pin switches add two plastic stabilizing legs for improved support.
Neither option is automatically better. The right choice depends on your PCB, mounting plate, hot-swap sockets, and preferred keyboard construction.
For businesses developing electronic products, selecting the appropriate PCB design and assembly approach is equally important for achieving dependable performance. Absolute Electronics Services provides PCB assembly service and electronic manufacturing solutions designed around specific project requirements, with capabilities covering SMT, through-hole, mixed-technology, prototyping, and production assembly.
By understanding how switch mounting works and checking PCB compatibility before installation, you can make a more informed decision and build a mechanical keyboard that offers the stability and typing experience you expect.